Businesses have been developing mobile apps for almost everything. Nearly every industry has mobile apps to keep its targeted audience engaged. If you plan to build a mobile app, there is no better platform to reach billions of users than the Apple Store. As an app founder, you would like to work hard to get featured on the App Store.
The Apple Store helps discover your app, generate more revenue, and boost your business globally. When the application is fully developed, the next step is to publish your product to the App Store. Publishing your first app is exciting, though it may be tricky. But don’t worry, because today we will guide you through submitting an app to the Apple Store.
1. Enroll in the Apple Developer Program:
Before you can submit your app, you need to be a member of the Apple Developer Program. This involves an annual fee, but it gives you access to a wealth of resources, including development tools, beta releases, and the ability to submit apps to the App Store.
Steps:
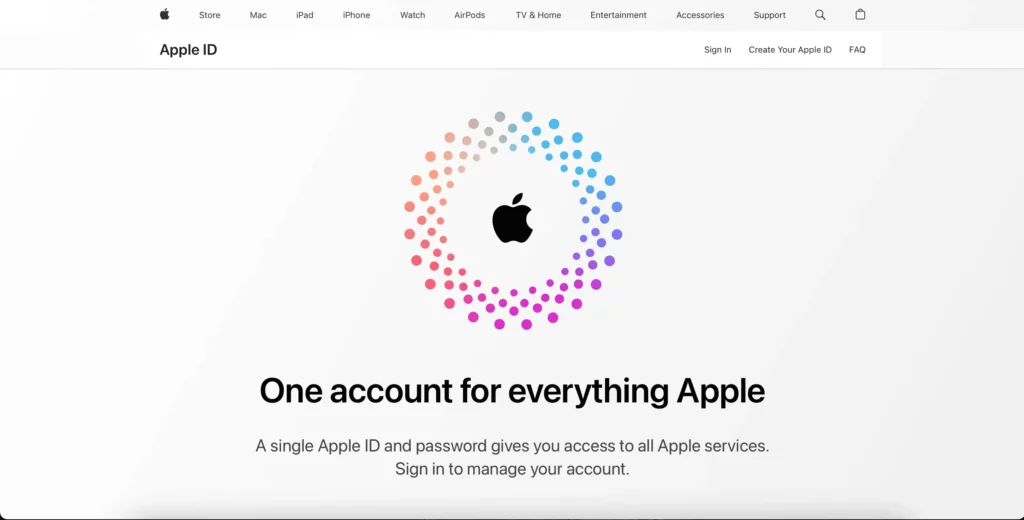
1.1. Go to the Apple Developer Program website.
1.2. Click on “Enroll” and sign in with your Apple ID.
1.3. Choose the appropriate membership type (Individual or Organization) and follow the enrollment steps.
1.4. Pay the annual fee to become a registered Apple Developer.
2. Prepare Your App:
Ensure your app complies with Apple’s guidelines. This includes addressing any bugs, ensuring a smooth user experience, and adhering to design and content guidelines. It’s crucial to test your app on various devices and iOS versions to catch any potential issues.
Steps:
2.1. Ensure your app complies with Apple’s App Store Review Guidelines.
2.2. Test your app thoroughly on various devices and iOS versions to identify and fix any bugs.
2.3. Optimize your app’s performance and user interface.
3. Create an App ID:
Every app on the App Store needs a unique identifier known as an App ID. You can create this through the Apple Developer Portal. Make sure to configure your App ID correctly, considering factors like App Services and App Groups if necessary.
Steps:
3.1. Log in to the Apple Developer Portal.
3.2. Navigate to the “Certificates, Identifiers & Profiles” section.
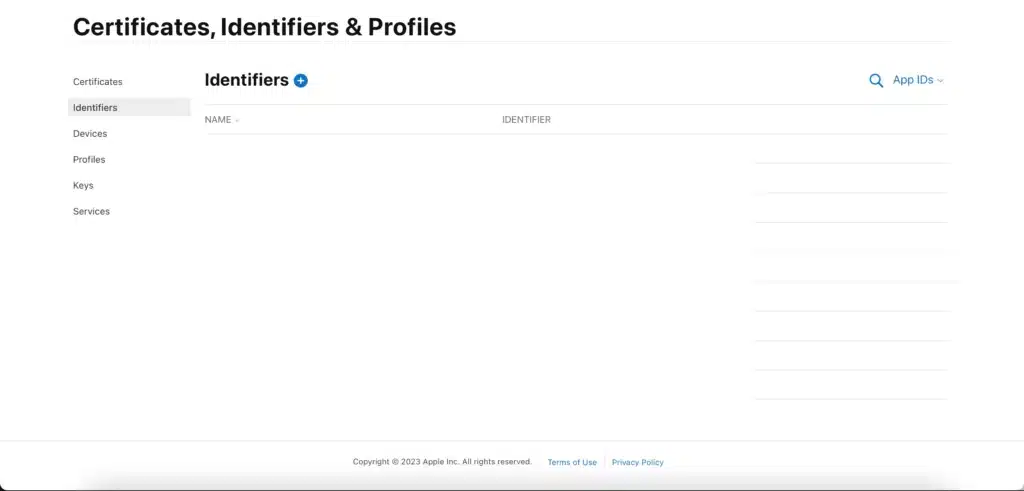
3.4 Click on + sign to the right of Identifiers.
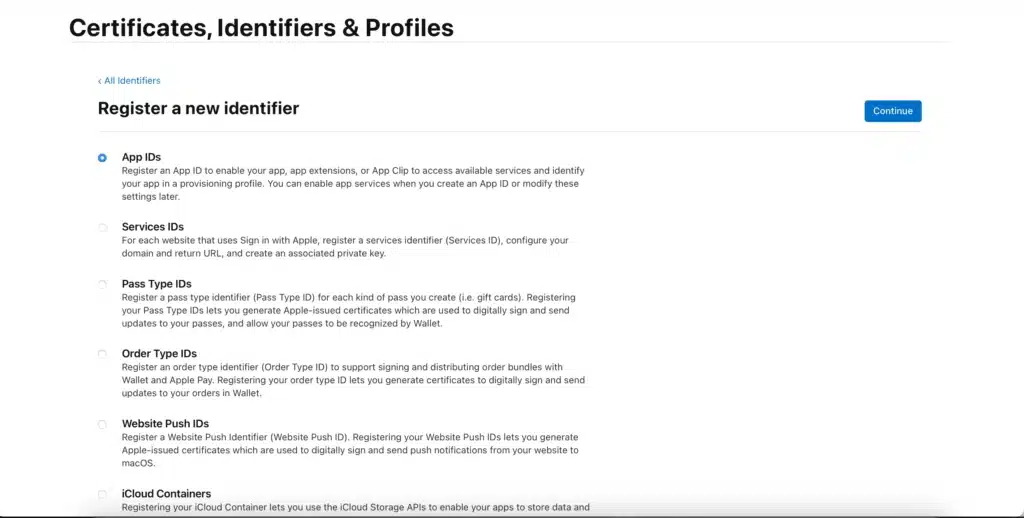
3.5 Select App IDs option and Continue.
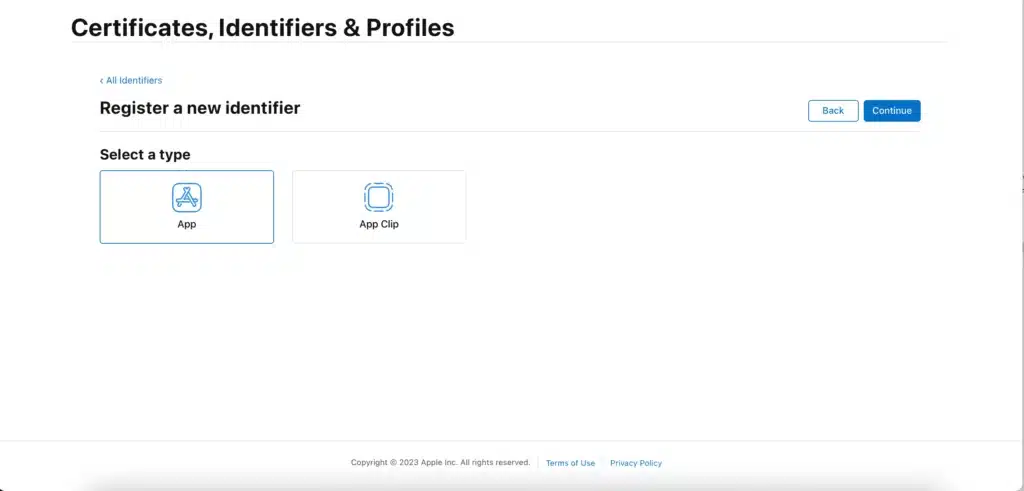
3.6 Select App and continue.
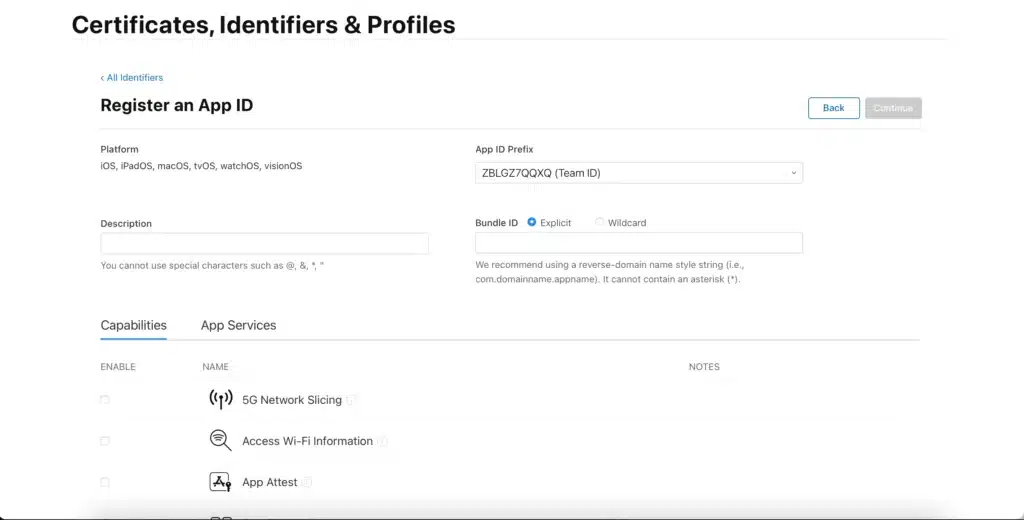
3.7 Create a new App ID for your app, ensuring it is unique and follows Apple’s guidelines.
Read More: How Much Does it Cost to Make an iPhone App
4. Generate a Distribution Certificate and Provisioning Profile:
Create a distribution certificate and provisioning profile to sign your app. This is essential for distributing your app outside of a development environment. You’ll need these to submit your app to the App Store.
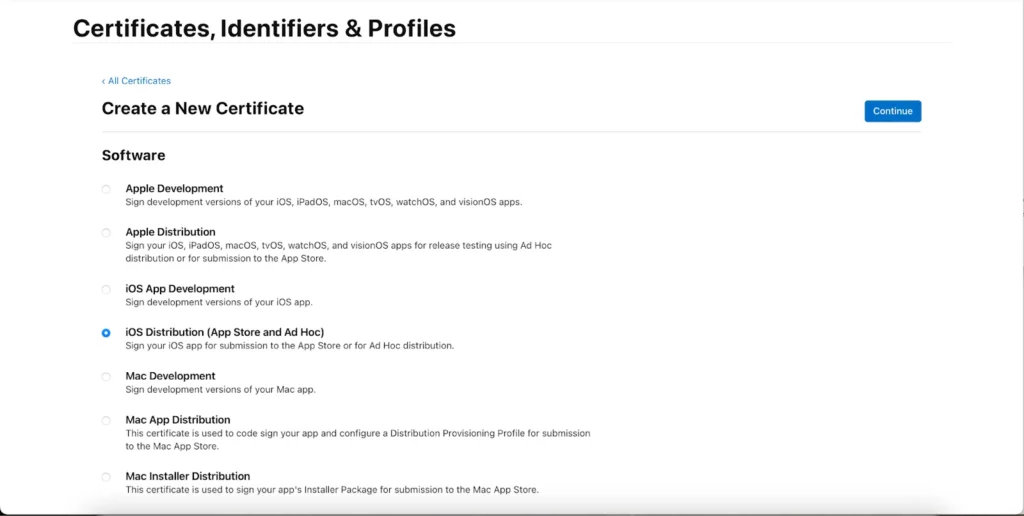
Steps:
4.1. In the Apple Developer Portal, go to “Certificates, Identifiers & Profiles.”
4.2. Create a Distribution Certificate for your app.
4.3. Create a Distribution Provisioning Profile and associate it with your App ID.
5. Prepare App Store Assets:
Gather the necessary assets for your App Store listing, including app icons, screenshots, a compelling app description, and any promotional materials. High-quality visuals and a well-crafted description can significantly impact user engagement.
Steps:
5.1. Design high-quality app icons and screenshots that showcase your app’s features.
5.2. Write a compelling app description highlighting key features and benefits.
5.3. Prepare promotional materials, if applicable.
6. Set Up App Store Connect:
App Store Connect is Apple’s platform for managing your apps on the App Store. Create a new app listing, providing all the required information, such as app name, description, keywords, and category.
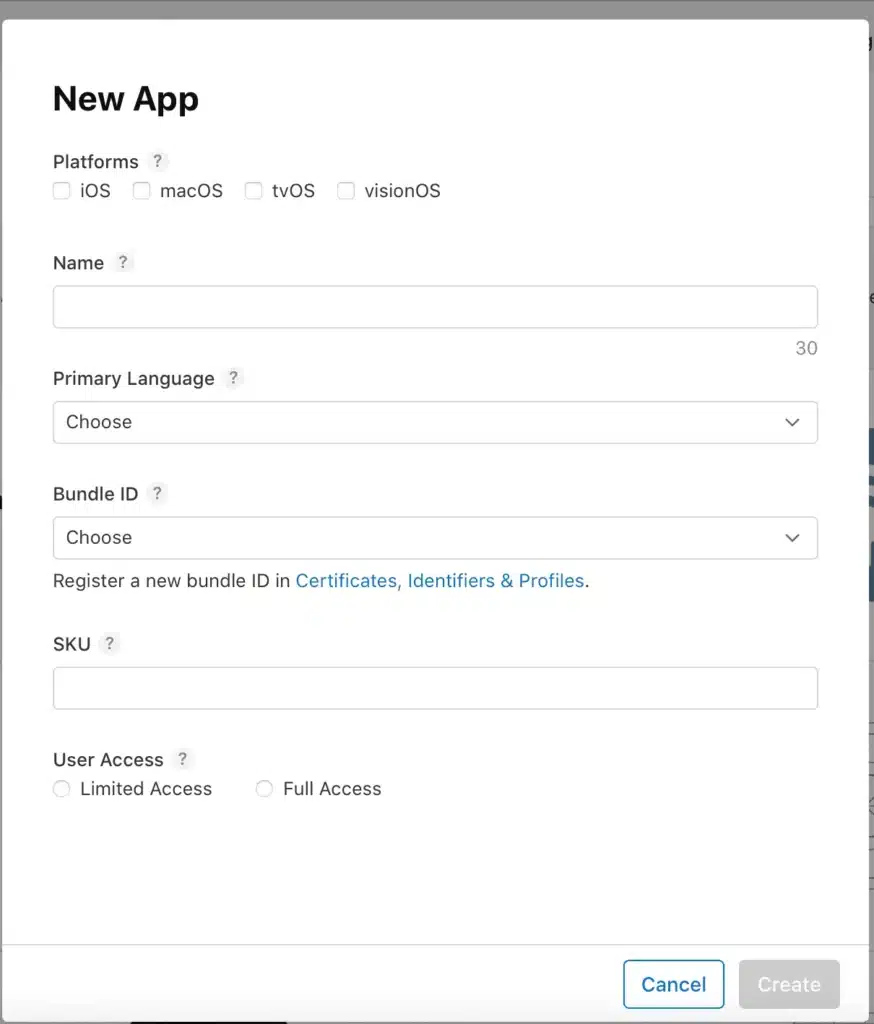
Steps:
6.1. Go to App Store Connect using your Apple Developer account.
6.2. Click on “My Apps” and then ” + ” to create a new app.
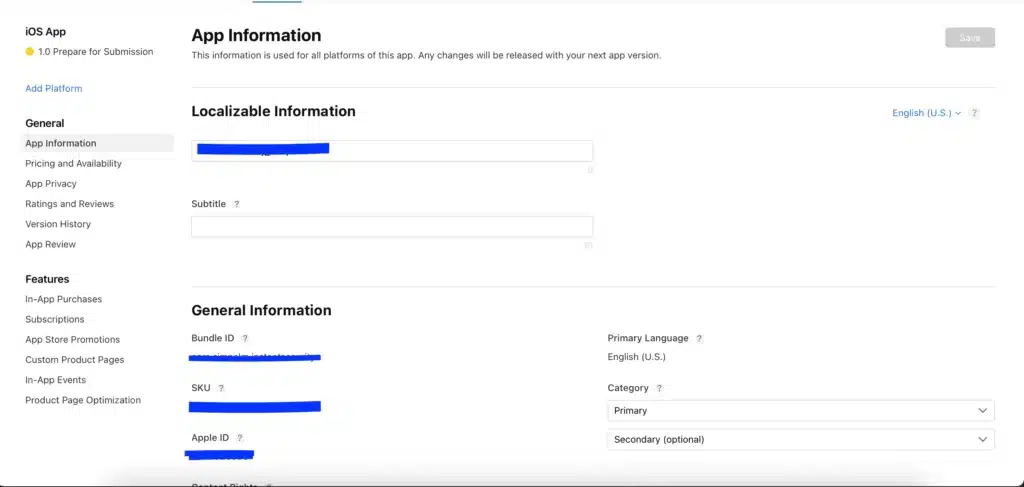
6.3. Fill in the required information, including app name, description, keywords, and category.
7. Submit Your App using Xcode:
Open your Xcode project, set the build configuration to “Release,” and select the appropriate distribution certificate and provisioning profile. Archive your project and then use Xcode to submit the app to the App Store through the Organizer window.
Steps:
7.1. Open your Xcode project.
7.2. Set the build configuration to “Release.”
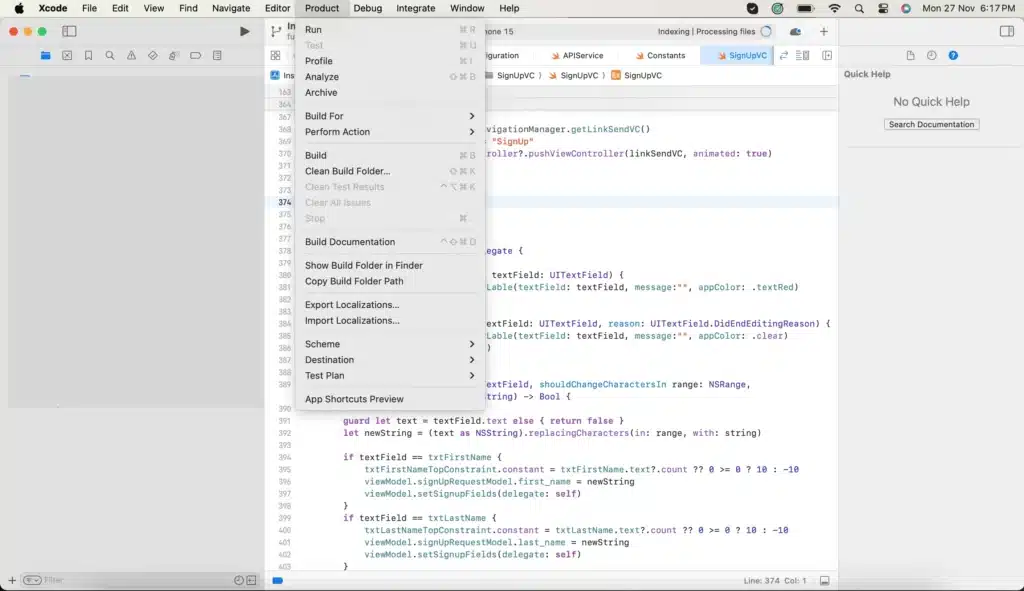
7.3. Select the appropriate Distribution Certificate and Provisioning Profile.
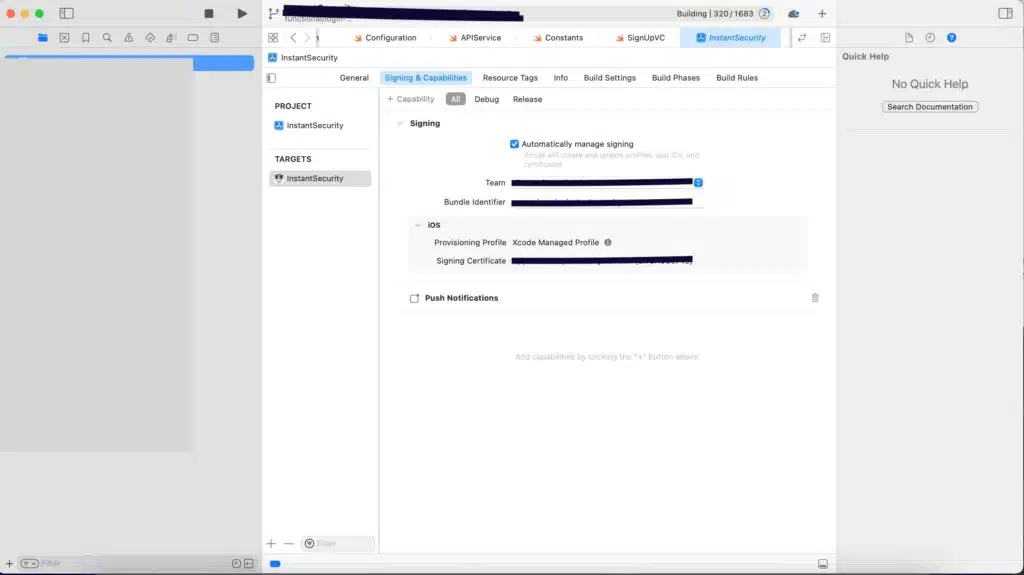
7.4. Archive your project using the “Archive” option in Xcode.
7.5. In the Organizer window, click “Distribute App” and choose “App Store Connect.”
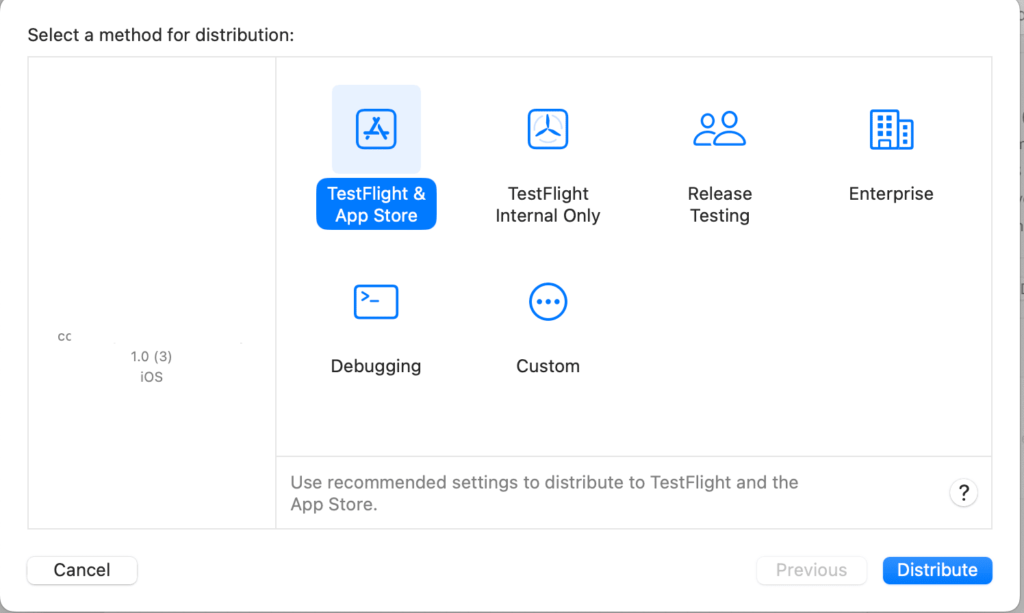
8. Complete App Store Connect Submission:
After submitting through Xcode, go back to App Store Connect to complete the submission process. You’ll need to provide additional details, such as pricing, territories, and any specific settings for your app.
Steps:
8.1. Return to App Store Connect and locate your app.
8.2. Fill in the remaining details, such as pricing, territories, and any specific settings.
8.3. Upload your app icon, screenshots, and other required assets.
8.4. Click “Submit for Review.”
9. Wait for Review:
Once your app is submitted, it goes through an App Store review process. Apple checks for compliance with guidelines and ensures the app works as intended. The review process can take some time, so be patient.
Steps:
9.1. Monitor the status of your app in App Store Connect.
9.2. Be patient as Apple conducts a review of your app. This process can take several days.
10. Release Your App:
Steps:
10.1. Once your app passes the review, you can set a release date or manually release it to the App Store.
10.2. Celebrate your successful app submission!
Read More: Top iOS App Development Tools to Build iPhone Apps
Conclusion
Submitting an app to the Apple App Store is a detailed process that requires careful preparation, strict adherence to Apple’s guidelines, and thorough testing at every stage. From enrolling in the Apple Developer Program and configuring certificates to preparing App Store assets and managing the review process, each step plays a critical role in ensuring a smooth and successful launch. With the right planning, technical expertise, and attention to detail, you can avoid common pitfalls and get your app approved faster. Partnering with an experienced mobile app development company can further simplify the submission process, ensure compliance with App Store standards, and help you launch a high-quality app that reaches a global audience.

 App Development
 Web Engineering
 AI Services
 Startups
 Health / Fitness
 Education
 Social
 Nonprofit
 Fintech
 Logistics
 Government
 HR Software
 About Simpalm
 Our News
 Client Testimonials
 Careers
 Awards
 Resources
 Information